Hi Everyone,
When implementing Single Sign On in Acumatica, sooner or later you may wish to remove Normal User / Password from the login screen.
Login page that had User/Password fields also Sign In button:
What I really wanted is to leave Company Choice and Blue Pyramid only:
Well, thanks to Acumatica RnD Team, we do not have such option under Acumatica UI yet...
So, have to become a little bit a "web designer" and, get to the IIS server, find Acumatica folder, where your site is installed and do a little modding on the Login.aspx
Normally this is C:\Program Files (x86)\Acumatica ERP\"YourInstanceName"\
There find the folder Frames, and inside will be Login.aspx file.
Make a copy of it :) just in case...
Now let's modify this file to hide what we don't want to show the ordinary user:
Add Visible = "false" here:
<asp:TextBox runat="server" ID="txtUser" CssClass="login_user border-box" placeholder="My Username" Visible="false" />
And here:
<asp:TextBox runat="server" ID="txtPass" Width="100%" CssClass="login_pass border-box" TextMode="Password" placeholder="My Password" Visible="false" />
And here:
<asp:Button runat="server" ID="btnLogin" Text="Sign In" OnClick="btnLogin_Click" CssClass="login_button" OnClientClick="login_Click()" Visible="false" />
Save, Restart, Enjoy.
Best,
Sergey.
What is happening with web based ERP in South East Asia. Specifically Acumatica, including cloud version deployed on MS Azure platform. In both, SaaS and on-premise delivery methods.
Showing posts with label Cloud. Show all posts
Saturday, July 20, 2019
Saturday, July 13, 2019
Tuesday, October 30, 2018
Enabling and Monitoring TLS on Acumatica
Hi Guys,
There is a lot of hoo-ha recently about switching to TLS 1.2....
Well, mainly, the sound comes from Acumatica marketing team and also from some of those "security advisers", reviewing for us what is secure and what is not.
So, here is the proposed way to enable TLS 1.1 and/or TLS 1.2 on your IIS server.
And also proposing a way to make sure (or monitor) that your dear clients are connecting their browsers using secure protocols.
What we need to do first is to disable insecure protocols and enable secure ones.
TLS 1.2 ONLY
You can also manually create reg file with this content. Please Note that this will also disable some less secure protocols like SSL 2.0, SSL 3.0, TLS 1.0 and TLS 1.1:
Windows Registry Editor Version 5.00
[HKEY_LOCAL_MACHINE\SYSTEM\CurrentControlSet\Control\SecurityProviders\SCHANNEL\Protocols\SSL 2.0\Client]
"DisabledByDefault"=dword:00000000
"Enabled"=dword:00000000
[HKEY_LOCAL_MACHINE\SYSTEM\CurrentControlSet\Control\SecurityProviders\SCHANNEL\Protocols\SSL 2.0\Server]
"DisabledByDefault"=dword:00000000
"Enabled"=dword:00000000
[HKEY_LOCAL_MACHINE\SYSTEM\CurrentControlSet\Control\SecurityProviders\SCHANNEL\Protocols\SSL 3.0\Client]
"DisabledByDefault"=dword:00000000
"Enabled"=dword:00000000
[HKEY_LOCAL_MACHINE\SYSTEM\CurrentControlSet\Control\SecurityProviders\SCHANNEL\Protocols\SSL 3.0\Server]
"DisabledByDefault"=dword:00000000
"Enabled"=dword:00000000
[HKEY_LOCAL_MACHINE\SYSTEM\CurrentControlSet\Control\SecurityProviders\SCHANNEL\Protocols\TLS 1.0\Client]
"DisabledByDefault"=dword:00000000
"Enabled"=dword:00000000
[HKEY_LOCAL_MACHINE\SYSTEM\CurrentControlSet\Control\SecurityProviders\SCHANNEL\Protocols\TLS 1.0\Server]
"DisabledByDefault"=dword:00000000
"Enabled"=dword:00000000
[HKEY_LOCAL_MACHINE\SYSTEM\CurrentControlSet\Control\SecurityProviders\SCHANNEL\Protocols\TLS 1.1\Client]
"DisabledByDefault"=dword:00000000
"Enabled"=dword:00000000
[HKEY_LOCAL_MACHINE\SYSTEM\CurrentControlSet\Control\SecurityProviders\SCHANNEL\Protocols\TLS 1.1\Server]
"DisabledByDefault"=dword:00000000
"Enabled"=dword:00000000
[HKEY_LOCAL_MACHINE\SYSTEM\CurrentControlSet\Control\SecurityProviders\SCHANNEL\Protocols\TLS 1.2\Client]
"DisabledByDefault"=dword:00000000
"Enabled"=dword:00000001
[HKEY_LOCAL_MACHINE\SYSTEM\CurrentControlSet\Control\SecurityProviders\SCHANNEL\Protocols\TLS 1.2\Server]
"DisabledByDefault"=dword:00000000
"Enabled"=dword:00000001
If you wish to leave TLS 1.1 enabled, please use another script instead:
TLS 1.1 and 1.2
Content would be like below, if you prefer to create .reg files manually:
Windows Registry Editor Version 5.00
[HKEY_LOCAL_MACHINE\SYSTEM\CurrentControlSet\Control\SecurityProviders\SCHANNEL\Protocols\SSL 2.0\Client]
"DisabledByDefault"=dword:00000000
"Enabled"=dword:00000000
[HKEY_LOCAL_MACHINE\SYSTEM\CurrentControlSet\Control\SecurityProviders\SCHANNEL\Protocols\SSL 2.0\Server]
"DisabledByDefault"=dword:00000000
"Enabled"=dword:00000000
[HKEY_LOCAL_MACHINE\SYSTEM\CurrentControlSet\Control\SecurityProviders\SCHANNEL\Protocols\SSL 3.0\Client]
"DisabledByDefault"=dword:00000000
"Enabled"=dword:00000000
[HKEY_LOCAL_MACHINE\SYSTEM\CurrentControlSet\Control\SecurityProviders\SCHANNEL\Protocols\SSL 3.0\Server]
"DisabledByDefault"=dword:00000000
"Enabled"=dword:00000000
[HKEY_LOCAL_MACHINE\SYSTEM\CurrentControlSet\Control\SecurityProviders\SCHANNEL\Protocols\TLS 1.0\Client]
"DisabledByDefault"=dword:00000000
"Enabled"=dword:00000000
[HKEY_LOCAL_MACHINE\SYSTEM\CurrentControlSet\Control\SecurityProviders\SCHANNEL\Protocols\TLS 1.0\Server]
"DisabledByDefault"=dword:00000000
"Enabled"=dword:00000000
[HKEY_LOCAL_MACHINE\SYSTEM\CurrentControlSet\Control\SecurityProviders\SCHANNEL\Protocols\TLS 1.1\Client]
"DisabledByDefault"=dword:00000000
"Enabled"=dword:00000001
[HKEY_LOCAL_MACHINE\SYSTEM\CurrentControlSet\Control\SecurityProviders\SCHANNEL\Protocols\TLS 1.1\Server]
"DisabledByDefault"=dword:00000000
"Enabled"=dword:00000001
[HKEY_LOCAL_MACHINE\SYSTEM\CurrentControlSet\Control\SecurityProviders\SCHANNEL\Protocols\TLS 1.2\Client]
"DisabledByDefault"=dword:00000000
"Enabled"=dword:00000001
[HKEY_LOCAL_MACHINE\SYSTEM\CurrentControlSet\Control\SecurityProviders\SCHANNEL\Protocols\TLS 1.2\Server]
"DisabledByDefault"=dword:00000000
"Enabled"=dword:00000001
After registry is updated please restart your server.
There could be an issue with FIPS enabled in your system, if .NET throws an error that:
"This implementation is not part of the Windows Platform FIPS validated cryptographic algorithms."
All you need to do is to disable FIPS under Local Security Policies.
All the best,
Sergey.
There is a lot of hoo-ha recently about switching to TLS 1.2....
Well, mainly, the sound comes from Acumatica marketing team and also from some of those "security advisers", reviewing for us what is secure and what is not.
So, here is the proposed way to enable TLS 1.1 and/or TLS 1.2 on your IIS server.
And also proposing a way to make sure (or monitor) that your dear clients are connecting their browsers using secure protocols.
What we need to do first is to disable insecure protocols and enable secure ones.
Adding TLS 1.1 and/or TLS 1.2 to your server
If you wish to add just TLS 1.2 please download a file and add registry information to your IIS SERVER, here is the example of the file from Rahul Kumar's blog:TLS 1.2 ONLY
You can also manually create reg file with this content. Please Note that this will also disable some less secure protocols like SSL 2.0, SSL 3.0, TLS 1.0 and TLS 1.1:
Windows Registry Editor Version 5.00
[HKEY_LOCAL_MACHINE\SYSTEM\CurrentControlSet\Control\SecurityProviders\SCHANNEL\Protocols\SSL 2.0\Client]
"DisabledByDefault"=dword:00000000
"Enabled"=dword:00000000
[HKEY_LOCAL_MACHINE\SYSTEM\CurrentControlSet\Control\SecurityProviders\SCHANNEL\Protocols\SSL 2.0\Server]
"DisabledByDefault"=dword:00000000
"Enabled"=dword:00000000
[HKEY_LOCAL_MACHINE\SYSTEM\CurrentControlSet\Control\SecurityProviders\SCHANNEL\Protocols\SSL 3.0\Client]
"DisabledByDefault"=dword:00000000
"Enabled"=dword:00000000
[HKEY_LOCAL_MACHINE\SYSTEM\CurrentControlSet\Control\SecurityProviders\SCHANNEL\Protocols\SSL 3.0\Server]
"DisabledByDefault"=dword:00000000
"Enabled"=dword:00000000
[HKEY_LOCAL_MACHINE\SYSTEM\CurrentControlSet\Control\SecurityProviders\SCHANNEL\Protocols\TLS 1.0\Client]
"DisabledByDefault"=dword:00000000
"Enabled"=dword:00000000
[HKEY_LOCAL_MACHINE\SYSTEM\CurrentControlSet\Control\SecurityProviders\SCHANNEL\Protocols\TLS 1.0\Server]
"DisabledByDefault"=dword:00000000
"Enabled"=dword:00000000
[HKEY_LOCAL_MACHINE\SYSTEM\CurrentControlSet\Control\SecurityProviders\SCHANNEL\Protocols\TLS 1.1\Client]
"DisabledByDefault"=dword:00000000
"Enabled"=dword:00000000
[HKEY_LOCAL_MACHINE\SYSTEM\CurrentControlSet\Control\SecurityProviders\SCHANNEL\Protocols\TLS 1.1\Server]
"DisabledByDefault"=dword:00000000
"Enabled"=dword:00000000
[HKEY_LOCAL_MACHINE\SYSTEM\CurrentControlSet\Control\SecurityProviders\SCHANNEL\Protocols\TLS 1.2\Client]
"DisabledByDefault"=dword:00000000
"Enabled"=dword:00000001
[HKEY_LOCAL_MACHINE\SYSTEM\CurrentControlSet\Control\SecurityProviders\SCHANNEL\Protocols\TLS 1.2\Server]
"DisabledByDefault"=dword:00000000
"Enabled"=dword:00000001
If you wish to leave TLS 1.1 enabled, please use another script instead:
TLS 1.1 and 1.2
Content would be like below, if you prefer to create .reg files manually:
Windows Registry Editor Version 5.00
[HKEY_LOCAL_MACHINE\SYSTEM\CurrentControlSet\Control\SecurityProviders\SCHANNEL\Protocols\SSL 2.0\Client]
"DisabledByDefault"=dword:00000000
"Enabled"=dword:00000000
[HKEY_LOCAL_MACHINE\SYSTEM\CurrentControlSet\Control\SecurityProviders\SCHANNEL\Protocols\SSL 2.0\Server]
"DisabledByDefault"=dword:00000000
"Enabled"=dword:00000000
[HKEY_LOCAL_MACHINE\SYSTEM\CurrentControlSet\Control\SecurityProviders\SCHANNEL\Protocols\SSL 3.0\Client]
"DisabledByDefault"=dword:00000000
"Enabled"=dword:00000000
[HKEY_LOCAL_MACHINE\SYSTEM\CurrentControlSet\Control\SecurityProviders\SCHANNEL\Protocols\SSL 3.0\Server]
"DisabledByDefault"=dword:00000000
"Enabled"=dword:00000000
[HKEY_LOCAL_MACHINE\SYSTEM\CurrentControlSet\Control\SecurityProviders\SCHANNEL\Protocols\TLS 1.0\Client]
"DisabledByDefault"=dword:00000000
"Enabled"=dword:00000000
[HKEY_LOCAL_MACHINE\SYSTEM\CurrentControlSet\Control\SecurityProviders\SCHANNEL\Protocols\TLS 1.0\Server]
"DisabledByDefault"=dword:00000000
"Enabled"=dword:00000000
[HKEY_LOCAL_MACHINE\SYSTEM\CurrentControlSet\Control\SecurityProviders\SCHANNEL\Protocols\TLS 1.1\Client]
"DisabledByDefault"=dword:00000000
"Enabled"=dword:00000001
[HKEY_LOCAL_MACHINE\SYSTEM\CurrentControlSet\Control\SecurityProviders\SCHANNEL\Protocols\TLS 1.1\Server]
"DisabledByDefault"=dword:00000000
"Enabled"=dword:00000001
[HKEY_LOCAL_MACHINE\SYSTEM\CurrentControlSet\Control\SecurityProviders\SCHANNEL\Protocols\TLS 1.2\Client]
"DisabledByDefault"=dword:00000000
"Enabled"=dword:00000001
[HKEY_LOCAL_MACHINE\SYSTEM\CurrentControlSet\Control\SecurityProviders\SCHANNEL\Protocols\TLS 1.2\Server]
"DisabledByDefault"=dword:00000000
"Enabled"=dword:00000001
There could be an issue with FIPS enabled in your system, if .NET throws an error that:
"This implementation is not part of the Windows Platform FIPS validated cryptographic algorithms."
All you need to do is to disable FIPS under Local Security Policies.
Disabling FIPS under Local Security Policies
1. Open Control Panel, click Administrative Tools, and then double-click Local Security Policy.
2. Under Local Security Settings, expand Local Policies, and then click Security Options.
3. Under Policy in the right pane, double-click System cryptography: Use FIPS compliant algorithms for encryption, hashing, and signing, and then click Disabled.
4. Run gpupdate /force
Monitoring the client communications protocol
This is the best part actually. After you enabled TLS 1.2 it is time to show the auditors that you are compliant 100% with what is called security. Today. So we may have IE, FireFox and Chrome.
Check the security protocol used on Internet Explorer
First you need to connect to your Acumatica using IE. I am demonstrating customer who is using Acumatica version 3.0. And, yes, 3.0 also supports TLS 1.2. Please note it should be HTTPS protocol of course:
Secondly, right click on the header of the screen (do not right click on grid!) and you will see a choice drop down. Click Properties:
Third, check the Connection.
Check the security protocol used on FireFox
Login, Click on (i) option, list to second page, enjoy
Click on this arrow > and you will see option then click More Information
![]() |
Then you will see detailed info
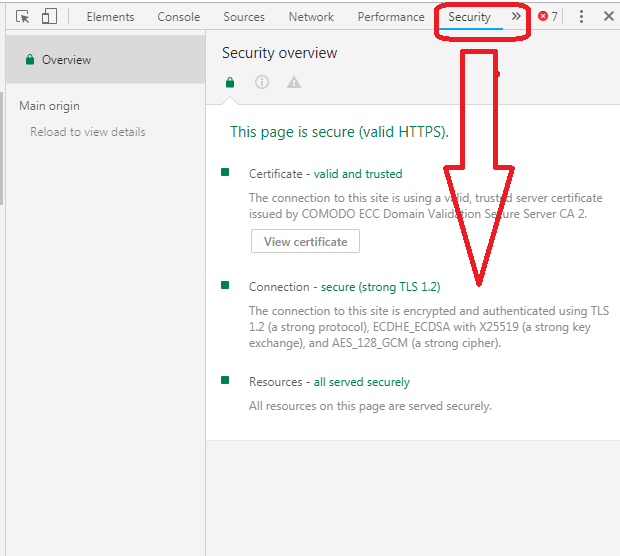
Check Security protocols used on Google Chrome
Here you need to press F12 and then choose Security option:
Sergey.
Sunday, September 9, 2018
Need an Acumatica Developer in Singapore.
Hi Everyone;
IF
You are a good developer in Acumatica framework
AND
Have 3 or more years of experience in developing Acumatica screens and functions
AND
(I know you OR (heard about you from Acumatica development team AND what I heard was positive))
AND
You are willing to work in Singapore
THEN
Please send me an email (you should know it) or just reply here with the request.
ELSE
Thank you, Sergey.
IF
You are a good developer in Acumatica framework
AND
Have 3 or more years of experience in developing Acumatica screens and functions
AND
(I know you OR (heard about you from Acumatica development team AND what I heard was positive))
AND
You are willing to work in Singapore
THEN
Please send me an email (you should know it) or just reply here with the request.
ELSE
Thank you, Sergey.
Tuesday, April 17, 2018
The Learning Lab - Acumatica Customer of the Year
Dear Reader!
I am Proud to announce:
The biggest Private Primary and Secondary Learning Provider in Singapore - The Learning Lab just achieved the Customer of the Year award at Acumatica Asia Roadshow 2018 !
Together with Info Cloud Asia - leading consulting firm in Singapore, TLL achieved flawless implementation and integrated Acumatica with the CRM front end, Attendance Tracking Security system as well as Claim Tracking.
Congratulations - it was an example of great team work!
All the best!
I am Proud to announce:
The biggest Private Primary and Secondary Learning Provider in Singapore - The Learning Lab just achieved the Customer of the Year award at Acumatica Asia Roadshow 2018 !
Together with Info Cloud Asia - leading consulting firm in Singapore, TLL achieved flawless implementation and integrated Acumatica with the CRM front end, Attendance Tracking Security system as well as Claim Tracking.
Congratulations - it was an example of great team work!
All the best!
Labels:
Automation,
Branding,
Cloud,
Implementation,
Sales Management,
Singapore Cloud ERP
Location:
Singapore
Thursday, July 27, 2017
Acumatica is on Gartner Magic Quadrant
Congratulations Everyone!
We have finally made it, now Acumatica is on Gartner.
You request for a copy here: Request Gartner Report
At the same time, PC Magazine made us top brands. I can not believe it :)
Full article here:
PC Magazine 2017
All the best,
Sergey.
We have finally made it, now Acumatica is on Gartner.
You request for a copy here: Request Gartner Report
At the same time, PC Magazine made us top brands. I can not believe it :)
Full article here:
PC Magazine 2017
All the best,
Sergey.
Wednesday, November 4, 2015
Login Page Customization.
Hi Guys,
Some time ago, there was a post on how to change the login pictures if you have access to Acumatica web site folder. But nowadays we all go cloud, heh, so no more access to IIS folders directly.
Well, so THIS POST is about How To Change the Login Pictures for your customer, without directly changing the files in the folder.
We can accomplish it by using simple customization technique. It proven on version 5.1 onwards, but should work on earlier as well.
What we are going to do is - by using a customization we will replace the files, located at the web site folder :)
Let's make it very simple, sorry, experienced C# developers, I will go step by step, so everyone can follow.
1. Make sure you can connect to Acumatica as a Customizer.
2. Place your picture files, resolution 1500 x 1000 pixels, in jpg format in a local folder on your working PC or laptop.
There should be max 6 pictures.
3. Login to Acumatica. Say goodbye to this guy. You are seeing him the last time...
4. Navigate to: Configuration->Common Settings->Site Preference
5. Upload here all your 6 files. Just Press Files->Then drag and drop all the files into upload screen.
6. Close the Files upload screen. Refresh the Site Preference screen. Click on FILES menu again. Now let's see all those files one by one in the browser. We need it to get ReferenceID for each file.
Just click on each file link, it will open you a tab in the browser.
Please note the number you need to record is highlighted. Please pull all 6 numbers for all 6 files into your notepad for future reference.
7. Now we are ready to hack Acumatica and insert our files directly into WEB site folder :) by customization. Go to System->Customization->Customization Projects. If you have one, select it, if you do not have existing customization, just create a new project. Then click on it. It will open a screen. There choose File->Edit Project XML
8. Now manually add the following records right after first line:
<File AppRelativePath="Icons\login_bg1.jpg" FileID="42acd25f-b952-46a2-aae8-35a802d1d47a" />
<File AppRelativePath="Icons\login_bg2.jpg" FileID="ac45d04a-7c4a-4cf1-bf42-3cdb517eecc6" />
<File AppRelativePath="Icons\login_bg3.jpg" FileID="28ee3171-e330-4de4-83bf-750e31eb2168" />
<File AppRelativePath="Icons\login_bg4.jpg" FileID="8d6876f9-5721-45e1-b481-9ca36e5eff49" />
<File AppRelativePath="Icons\login_bg5.jpg" FileID="809703c6-a689-4218-8347-a6d78f563ae0" />
<File AppRelativePath="Icons\login_bg6.jpg" FileID="b11ad862-1ef2-47d4-8c8b-f398383552b1" />
Please note last part is the reference from out Notepad.
9. Press button Save to database. Screen will refresh and your records will be moved somewhere down to the file body, you can find them by scrolling down, no worries, they are NOT gone.
10. Now from the menu on top choose Publish->Publish Current Project. Validation will start and prompt you a message:
Ignore it :). Press Publish.
11. Enjoy your brand new Acumatica system
All the best,
Sergey.
Some time ago, there was a post on how to change the login pictures if you have access to Acumatica web site folder. But nowadays we all go cloud, heh, so no more access to IIS folders directly.
Well, so THIS POST is about How To Change the Login Pictures for your customer, without directly changing the files in the folder.
We can accomplish it by using simple customization technique. It proven on version 5.1 onwards, but should work on earlier as well.
What we are going to do is - by using a customization we will replace the files, located at the web site folder :)
Let's make it very simple, sorry, experienced C# developers, I will go step by step, so everyone can follow.
1. Make sure you can connect to Acumatica as a Customizer.
2. Place your picture files, resolution 1500 x 1000 pixels, in jpg format in a local folder on your working PC or laptop.
There should be max 6 pictures.
3. Login to Acumatica. Say goodbye to this guy. You are seeing him the last time...
4. Navigate to: Configuration->Common Settings->Site Preference
5. Upload here all your 6 files. Just Press Files->Then drag and drop all the files into upload screen.
6. Close the Files upload screen. Refresh the Site Preference screen. Click on FILES menu again. Now let's see all those files one by one in the browser. We need it to get ReferenceID for each file.
Just click on each file link, it will open you a tab in the browser.
Please note the number you need to record is highlighted. Please pull all 6 numbers for all 6 files into your notepad for future reference.
7. Now we are ready to hack Acumatica and insert our files directly into WEB site folder :) by customization. Go to System->Customization->Customization Projects. If you have one, select it, if you do not have existing customization, just create a new project. Then click on it. It will open a screen. There choose File->Edit Project XML
8. Now manually add the following records right after first line:
<File AppRelativePath="Icons\login_bg1.jpg" FileID="42acd25f-b952-46a2-aae8-35a802d1d47a" />
<File AppRelativePath="Icons\login_bg2.jpg" FileID="ac45d04a-7c4a-4cf1-bf42-3cdb517eecc6" />
<File AppRelativePath="Icons\login_bg3.jpg" FileID="28ee3171-e330-4de4-83bf-750e31eb2168" />
<File AppRelativePath="Icons\login_bg4.jpg" FileID="8d6876f9-5721-45e1-b481-9ca36e5eff49" />
<File AppRelativePath="Icons\login_bg5.jpg" FileID="809703c6-a689-4218-8347-a6d78f563ae0" />
<File AppRelativePath="Icons\login_bg6.jpg" FileID="b11ad862-1ef2-47d4-8c8b-f398383552b1" />
Please note last part is the reference from out Notepad.
9. Press button Save to database. Screen will refresh and your records will be moved somewhere down to the file body, you can find them by scrolling down, no worries, they are NOT gone.
10. Now from the menu on top choose Publish->Publish Current Project. Validation will start and prompt you a message:
Ignore it :). Press Publish.
11. Enjoy your brand new Acumatica system
All the best,
Sergey.
Tuesday, June 9, 2015
Adding Verification Logic to a Field
Hi Guys,
There is a common customization task to add some piece of business logic to a field.
Here is the example of adding verification to a Journal Transaction screen.
In short, for certain Accounts (Expense and Income) I will need to check that user entered Customer or Vendor into Journal Transaction screen. Balance Sheet accounts should be skipped.
Here is how it supposed to look like:
Thanks to a reworked Acumatica API documentation, it was not a Rocket Science to develop a simple piece of code below that covers this logic:
Please take note of:
sender.RaiseExceptionHandling<GLTran.referenceID>(e.Row, row.ReferenceID, new PXSetPropertyException(ErrorMessages.FieldIsEmpty , PXErrorLevel.RowError, typeof(GLTran.referenceID).Name));
That identifies where exactly to show a red cross Error.
All the Best,
Sergey.
There is a common customization task to add some piece of business logic to a field.
Here is the example of adding verification to a Journal Transaction screen.
In short, for certain Accounts (Expense and Income) I will need to check that user entered Customer or Vendor into Journal Transaction screen. Balance Sheet accounts should be skipped.
Here is how it supposed to look like:
Thanks to a reworked Acumatica API documentation, it was not a Rocket Science to develop a simple piece of code below that covers this logic:
Please take note of:
sender.RaiseExceptionHandling<GLTran.referenceID>(e.Row, row.ReferenceID, new PXSetPropertyException(ErrorMessages.FieldIsEmpty , PXErrorLevel.RowError, typeof(GLTran.referenceID).Name));
That identifies where exactly to show a red cross Error.
All the Best,
Sergey.
Thursday, October 30, 2014
Free Acumatica Sandbox
Hi Everyone,
Acumatica team released a marketing document, explaining sandbox usage. What I am really happy about is a clear black and white statement there.
We are not robbing our customers when they decided to use Acumatica sandbox for training, testing, archival purposes. Local sandbox is free of charge.
Would you decide to put it on our cloud, it will have some nominal fees involved, but again, if you need it FOC, install locally and enjoy!
WHAT IS AN ACUMATICA SANDBOX?
An Acumatica Sandbox is a separate instance of your Acumatica environment. You can
do anything you want in the sandbox – all without impacting your current deployment
and your users.
A Smooth Transition For New Rollouts Or New Employees
Leverage an Acumatica Sandbox to give new or existing users a hands-on experience
with Acumatica. Safely verify features and functionality, grant limited access to drive
adoption with power users without impacting other groups of less frequent users, and
also test customizations and integrations before making them live.
A Reliable Development Environment
An Acumatica Sandbox allows you to develop and test new solutions for your
organization in an environment that mirrors your live implementation. This enables
you to test real-world scenarios and involve users from different function areas before
going live.
Sandbox + Snapshot = Peace Of Mind
If you have a Private Cloud sandbox, you can use Acumatica’s advanced snapshot
technology to quickly set up your sandbox. You can take a snapshot of your Acumatica
instance at any time, and restore the downloaded copy to the sandbox environment
which you then manage separately. This enables you to test or modify your current
Acumatica instance without impacting users or your live deployment. Your partner can
help set up your first local instance.
WHICH SANDBOX IS RIGHT FOR ME?
Acumatica offers multiple sandbox options to meet your business requirements.
Whether you have a SaaS, SOP, or perpetual license, you can deploy your sandbox
wherever you prefer.
Thank you Acumatica team!
All the best,
Sergey.
Acumatica team released a marketing document, explaining sandbox usage. What I am really happy about is a clear black and white statement there.
We are not robbing our customers when they decided to use Acumatica sandbox for training, testing, archival purposes. Local sandbox is free of charge.
Would you decide to put it on our cloud, it will have some nominal fees involved, but again, if you need it FOC, install locally and enjoy!
WHAT IS AN ACUMATICA SANDBOX?
An Acumatica Sandbox is a separate instance of your Acumatica environment. You can
do anything you want in the sandbox – all without impacting your current deployment
and your users.
A Smooth Transition For New Rollouts Or New Employees
Leverage an Acumatica Sandbox to give new or existing users a hands-on experience
with Acumatica. Safely verify features and functionality, grant limited access to drive
adoption with power users without impacting other groups of less frequent users, and
also test customizations and integrations before making them live.
A Reliable Development Environment
An Acumatica Sandbox allows you to develop and test new solutions for your
organization in an environment that mirrors your live implementation. This enables
you to test real-world scenarios and involve users from different function areas before
going live.
Sandbox + Snapshot = Peace Of Mind
If you have a Private Cloud sandbox, you can use Acumatica’s advanced snapshot
technology to quickly set up your sandbox. You can take a snapshot of your Acumatica
instance at any time, and restore the downloaded copy to the sandbox environment
which you then manage separately. This enables you to test or modify your current
Acumatica instance without impacting users or your live deployment. Your partner can
help set up your first local instance.
WHICH SANDBOX IS RIGHT FOR ME?
Acumatica offers multiple sandbox options to meet your business requirements.
Whether you have a SaaS, SOP, or perpetual license, you can deploy your sandbox
wherever you prefer.
Thank you Acumatica team!
All the best,
Sergey.
Tuesday, July 29, 2014
Scheduling an Import Process
Hi Guys,
Here is how you can put your Integration with say POS system on schedule in our Import Scenarios process.
First of all, I assume you already created an Import Scenario and tested it with the file uploaded to the Acumatica.
Secondly, you have to ensure that the source file is placed inside Acumatica on time.
Third thing, and that is what I am to explain, we have to schedule a process, inside Acumatica, that will take the file from above. Get the data out of it, and then insert these data into Acumatica screens.
A. Open Import Scenarios process.
B. Select the Import Scenario(s) we need to schedule for execution and select the Action. Save It.
C. Use the Schedule Button to create a schedule.
D. Give it a Name and schedule options.
E. Finally you can specify some conditions, on when exactly trigger the scheduled import.
F. Save and Close the Automation Schedules screen.
Well if you wish to review the parameters, at any time just click View from Schedule button, it will bring you to the Automation Schedules screen again.
All the best,
Sergey.
Here is how you can put your Integration with say POS system on schedule in our Import Scenarios process.
First of all, I assume you already created an Import Scenario and tested it with the file uploaded to the Acumatica.
Secondly, you have to ensure that the source file is placed inside Acumatica on time.
Third thing, and that is what I am to explain, we have to schedule a process, inside Acumatica, that will take the file from above. Get the data out of it, and then insert these data into Acumatica screens.
A. Open Import Scenarios process.
B. Select the Import Scenario(s) we need to schedule for execution and select the Action. Save It.
C. Use the Schedule Button to create a schedule.
D. Give it a Name and schedule options.
E. Finally you can specify some conditions, on when exactly trigger the scheduled import.
F. Save and Close the Automation Schedules screen.
Well if you wish to review the parameters, at any time just click View from Schedule button, it will bring you to the Automation Schedules screen again.
All the best,
Sergey.
Thursday, July 10, 2014
What is our Project Success Rate?
Hi Everyone,
Just heard some of the competition ERP vendors being sued by customers, this is of course very bad sign.
This leads to the question about Right's or Wrong's in a sales strategy, not just in product itself. For example. Over-promising will always lead to a low project success rate. Hiring wrong partners - the same. Using doubtful sales strategies (bulk sales, sales in advance etc.) will cause partners to become unhappy as well, by pushing them to sale more and implement worse.
So what is all about? Is it applicable to Acumatica? I would not use marketing BS here, just wanted to share my experience from partner meetings.
Being in Philippines with our partners. And now I wanted to share the Success Rate for implementation projects in ERP industry. There were reports suggesting that it is very low in the industry, overall.
Some people say it is as low as 50%
Chaos Report
NOT FOR ACUMATICA :)
Surprisingly what I found from Acumatica partners, success in our product implementation is much higher.
For some partners it is constant at stuggering 100%. Example Global Ideology Corporation.
3 years on the market, 6 finished projects, 100% success rate.
Average implementation cycle: 2 month.
So I would love to hear from you guys, being a partner, what is your Customer Happiness index, or Project Success Rate. In a very simple scale. Customer is happy or customer is not.
Just do a simple analysis, compare products if you sell competition.
All the best,
Sergey.
Just heard some of the competition ERP vendors being sued by customers, this is of course very bad sign.
This leads to the question about Right's or Wrong's in a sales strategy, not just in product itself. For example. Over-promising will always lead to a low project success rate. Hiring wrong partners - the same. Using doubtful sales strategies (bulk sales, sales in advance etc.) will cause partners to become unhappy as well, by pushing them to sale more and implement worse.
So what is all about? Is it applicable to Acumatica? I would not use marketing BS here, just wanted to share my experience from partner meetings.
Being in Philippines with our partners. And now I wanted to share the Success Rate for implementation projects in ERP industry. There were reports suggesting that it is very low in the industry, overall.
Some people say it is as low as 50%
Chaos Report
NOT FOR ACUMATICA :)
Surprisingly what I found from Acumatica partners, success in our product implementation is much higher.
For some partners it is constant at stuggering 100%. Example Global Ideology Corporation.
3 years on the market, 6 finished projects, 100% success rate.
Average implementation cycle: 2 month.
So I would love to hear from you guys, being a partner, what is your Customer Happiness index, or Project Success Rate. In a very simple scale. Customer is happy or customer is not.
Just do a simple analysis, compare products if you sell competition.
All the best,
Sergey.
Sunday, June 22, 2014
Cloud Concept. Cambodia.
Hi Everyone,
Surprisingly Cambodia market grows very fast, and Cloud is much appreciated there.
Wanted to share some pictures from recent event in Phnom Penh.
Thanks to SunFix and personally Kosol Sieng.
All the best,
Sergey.
Surprisingly Cambodia market grows very fast, and Cloud is much appreciated there.
Wanted to share some pictures from recent event in Phnom Penh.
Thanks to SunFix and personally Kosol Sieng.
All the best,
Sergey.
Friday, June 13, 2014
Acumatica seems to be the Fastest Web based ERP
Hi Everyone,
Let me propose a contest. Lets measure web based ERPs performance.
After we made multiple installation, demos and research, it seems that Acumatica is the fastest.
Not just fastest but far ahead of any other ERP that uses your browser as a mean of data entry.
I know, this post may look provocative, but I wish to see fair competition results!
Same as we see nowadays in Brazil World Cup :) fair play guys!
Contest please!
Rules are simple.
1. Take the file with 1000 lines of General Ledger transactions.
2. Import it into your ERP using either web services or any data import you have in it. Copy paste will do if you have it in your ERP.
3. Save the transaction.
4. Measure the result.
Below is the video on how it is done in Acumatica. Please take note I purposely make this batch imbalanced to test import process validation. As you may see at the end Debit and Credit for the batch is calculated properly and document require correction for the difference.
Here we go:
If you accept the challenge, please post at the comment your results. Thanks!
All the best,
Sergey.
Let me propose a contest. Lets measure web based ERPs performance.
After we made multiple installation, demos and research, it seems that Acumatica is the fastest.
Not just fastest but far ahead of any other ERP that uses your browser as a mean of data entry.
I know, this post may look provocative, but I wish to see fair competition results!
Same as we see nowadays in Brazil World Cup :) fair play guys!
Contest please!
Rules are simple.
1. Take the file with 1000 lines of General Ledger transactions.
2. Import it into your ERP using either web services or any data import you have in it. Copy paste will do if you have it in your ERP.
3. Save the transaction.
4. Measure the result.
Below is the video on how it is done in Acumatica. Please take note I purposely make this batch imbalanced to test import process validation. As you may see at the end Debit and Credit for the batch is calculated properly and document require correction for the difference.
Here we go:
If you accept the challenge, please post at the comment your results. Thanks!
All the best,
Sergey.
Friday, May 16, 2014
Securing the Branch Access
Hi Guys,
Quick post, when it comes to multiple branches sitting inside single database of your Acumatica instance, we may need to assign login and access rights to different users to see different branches.
So this is about tenancy that we have inside Acumatica. We can have multiple companies, or tenants, and this will be a topic for another article, and inside each tenant I can create multiple Branches. These branches, or related companies, will share same COA, same customers/vendors etc. But, important note, we can report everything separately, including VAT tax. So this is important feature for those running multiple company business under one roof.
So how to secure access to each branch for certain people only. Very simple:
1. Create Roles with somewhat resembling branch name or code. These security roles will be only used for branch access control.
2. Add users to that Role, the only users who need access to South branch in my example.
3. And the last step, specify this role at the Branch maintenance screen.
All access will be set automatically by the Acumatica, based on the above settings.
Best,
Sergey.
Quick post, when it comes to multiple branches sitting inside single database of your Acumatica instance, we may need to assign login and access rights to different users to see different branches.
So this is about tenancy that we have inside Acumatica. We can have multiple companies, or tenants, and this will be a topic for another article, and inside each tenant I can create multiple Branches. These branches, or related companies, will share same COA, same customers/vendors etc. But, important note, we can report everything separately, including VAT tax. So this is important feature for those running multiple company business under one roof.
So how to secure access to each branch for certain people only. Very simple:
1. Create Roles with somewhat resembling branch name or code. These security roles will be only used for branch access control.
2. Add users to that Role, the only users who need access to South branch in my example.
3. And the last step, specify this role at the Branch maintenance screen.
All access will be set automatically by the Acumatica, based on the above settings.
Best,
Sergey.
Tuesday, May 6, 2014
Refreshing Data in Excel from Acumatica Inquiries
Hi Everyone,
In Acumatica we have a powerful feature - inquiry, where if you export it to Excel, it takes the link to the data in Acumatica with it. So later you can just refresh the data right from Excel.
The main problem with that is - when you try to refresh the data, it prompts that Basic Authentication is not allowed for say Office 2010 to get the data from the server.
We can easily overcome it by adding the following 2 records to the registry.
1. Take these records.
2. Save them into a Notepad.
3. Save Notepad file as .reg
4. Run it.
This will add them to your PC registry. Alternatively you can simply add them manually to the registry using RegEdit editor.
Windows Registry Editor Version 5.00
[HKEY_CURRENT_USER\Software\Microsoft\Office\14.0\Common\Internet]
"BasicAuthLevel"=dword:00000002
[HKEY_LOCAL_MACHINE\SYSTEM\CurrentControlSet\services\WebClient\Parameters]
"BasicAuthLevel"=dword:00000002
Now let me explain what exactly is the error and what will happen at the end when we fixed it.
Open Inquiry then press Excel button to export its content to Excel:
When file is saved, try to open it, then press Refresh Data button, here is what will happen in 99% of the cases:
It says, Basic Authentication is disabled by Default for access of non SSL servers.
I am not sure for demo purposes how many of us use SSL...
So the only way to solve it, either use SSL server or simply allow Basic Authentication to get used by Office 2010 by default.
Please use the Registry amendment above to allow Basic Authentication.
Then, after restarting your PC here what will happen:
Here we need to provide username and password in a format user@company
For example for Demo company that I have on my PC it will be:
Then after pressing OK it goes to the server, retrieves all the records
And done, success:
Well, if you are too much concerned about security and do not wish to keep Basic Authentication always open, just change the values back to 1 from 2 in the reg file. :)
All the best,
Sergey.
In Acumatica we have a powerful feature - inquiry, where if you export it to Excel, it takes the link to the data in Acumatica with it. So later you can just refresh the data right from Excel.
The main problem with that is - when you try to refresh the data, it prompts that Basic Authentication is not allowed for say Office 2010 to get the data from the server.
We can easily overcome it by adding the following 2 records to the registry.
1. Take these records.
2. Save them into a Notepad.
3. Save Notepad file as .reg
4. Run it.
This will add them to your PC registry. Alternatively you can simply add them manually to the registry using RegEdit editor.
Windows Registry Editor Version 5.00
[HKEY_CURRENT_USER\Software\Microsoft\Office\14.0\Common\Internet]
"BasicAuthLevel"=dword:00000002
[HKEY_LOCAL_MACHINE\SYSTEM\CurrentControlSet\services\WebClient\Parameters]
"BasicAuthLevel"=dword:00000002
Now let me explain what exactly is the error and what will happen at the end when we fixed it.
Open Inquiry then press Excel button to export its content to Excel:
When file is saved, try to open it, then press Refresh Data button, here is what will happen in 99% of the cases:
It says, Basic Authentication is disabled by Default for access of non SSL servers.
I am not sure for demo purposes how many of us use SSL...
So the only way to solve it, either use SSL server or simply allow Basic Authentication to get used by Office 2010 by default.
Please use the Registry amendment above to allow Basic Authentication.
Then, after restarting your PC here what will happen:
Here we need to provide username and password in a format user@company
For example for Demo company that I have on my PC it will be:
Then after pressing OK it goes to the server, retrieves all the records
And done, success:
Well, if you are too much concerned about security and do not wish to keep Basic Authentication always open, just change the values back to 1 from 2 in the reg file. :)
All the best,
Sergey.
Subscribe to:
Posts (Atom)