Showing posts with label Purchase Management. Show all posts

Wednesday, June 4, 2014

Adding Field (Selector) with Exotic Attributes (Project, Customer etc.)

Hi Everyone,

Goal for today: reuse attributes of the Acumatica fields.

I am sure most of you when tried to add a new field to Acumatica, was thinking about reusing the selector from an existing fields.

For example, in a screen for RQ Request I would like to add Project ID field.
I know that this field is used in GL Journal Transaction details also in AR Invoice header screen and many other places.

There is one issue, however...

When i look at the Attributes of this field, I found scribblings that impossible to understand and therefore reuse:


This attribute is hardcoded somewhere in Acumatica, and is very hard to understand what is inside this ActiveProjectForModule...

Well, it was a problem till version 4.2. Before the browser did not display special source code.
But now, in Acumatica 4.2 onward, I can find what is behind this sacred code and reuse it the way I want.

Let me show the place where you can search for the code.

Navigate to your web site then App_Data\Code Repository\PX.Objects\PM\Descriptor\
Here we have a file Attribute.cs lets open it and find what we want, basically search for ActiveProjectForModule:


You may see, there are 4 constructor elements inside this class. Choose the best appropriate, I would take simplest one: ActiveProjectForModuleAttribute(string module)

Lets use this attribute for the newly added control at the requisition module:

1. I do not need to default anything.
2. [PM.ActiveProjectForModule(PX.Objects.GL.BatchModule.AR)] will be the attribute.

Why PX.Objects.GL. need to be added in forn - is due to Attributes are not in the main graph form and need to be declared directly.
So we have a single parameter left from the original AR Screen attribute.


And result here we are:


All the best,

Sergey.

Wednesday, August 28, 2013

Linking Sales Order to Purchase. Stock Allocation.

Hi Everyone,

One of the questions from our partners was - why don't we have a topic at Acumatica University on how to tie Sales Order to Purchase Order, then break this link, then see the goods allocation in the inventory.

Basic business process behind is when we sell something we may wish to buy goods for this specific sales order. And then, at some point we may reconsider and dedicate goods for another Sales.

I am using Demo database to demonstrate it.

What I did first is switched off sub items, not to mess up the picture.
(Well, if you like to know how to switch off sub items on demo database, please let me know, it was done not from UI.)


Step One. Create an Item in Stock Items screen.

Nothing special. Using version 4.1


After Item created I made a receipt in Inventory for 1000 pieces.


Step Two. Make a Sales Order.

Here I used the above item indicating a line should be Ship Complete. Added some quantity and price. Take note of Mark for PO check box. Will use it in the next step.


Step Three. Link SO to Existing PO.

To achieve it, will mark check box Mark for PO. Then Press PO Link button.
We may already have a PO, so we can link to existing one.


We should select the line on that screen then Save to mark that existing PO to the SO.

Step Three A. Create PO for SO on the fly.

Alternatively we may wish to create new PO for that Sales Order. Let's go to Actions->Create a PO. Then screen below comes out. Here we need to indicate the Vendor and Location and then click Process to create a PO. Once created, SO will get link to that PO automatically.


Here is the SO. Take note of the link.


Step Four. Break the link. Allocate to Another PO.

Let say we have reconsidered and wanted to reallocate the sales order to another vendor PO.
This is achieved at the Sales order. Unchecked Mark for PO on the line, save. It will automatically remove PO link. Now lets link to another vendor PO. Check Mark for PO again. Save.
Then call PO Link button. Now we can choose another vendor and PO.


Step Five. Verify Figures.

We can use either Inventory Summary to see current inventory positions


Or Allocation Details


Step Six. Receive PO and see what Happened.

Here is the receipt


And Sales Order can be now shipped. I created shipper document then confirmed it. Standard process.

Question why do we swap POs for a single SO - could be if we want to manage sales better, let say we expect delivery of the same car parts faster from vendor A than vendor B, and have customer RIGHT IN FRONT waiting... We may wish to consider reallocation POs... ;)

All the Best,

Sergey.

Monday, July 16, 2012

Sending Notifications.

Hi All,

One of the common questions, when implementing automation for operations is - how can we send an email notification to a person that such and such is happened?
It could be for example Purchase Order is created and we want short e-mail to get send to procurement chief.

Using Notifications in Acumatica is a natural answer to all that.

Task: I want to send a notification to Steve Church once the purchase order status is changed to Open (meaning PO is approved/printed).

Step 1. We should set appropriate e-mail to the user Steve Church

Step 2. Now need to create a notification in system manager.

Please note, Screen ID should be Purchase Order, since we want changing of the status in THIS screen to trigger a notification event. In the Message body I want to be mentioned that system should include actual PO number that was created, so I use standard Template Notification syntax of ((fieldname)). I also want actual PO Form to get attached to my e-mail, so user can review it, I just added Data Source: Report with format PDF.

On the next tabs I mentioned Event Conditions, Addresses, Parameters, which are self explanatory:

3. Now we have to decide if we send these notifications using a schedule or manually calling a process. I wanted to use a manual process, but schedule can be added that will trigger it every say 1 minute.


4. Now we can finally go to the Purchase Order and "open" one, to see what will happen:

After it was saved lets take a look at Send Notification screen. My note is pending (since I was lazy to create a schedule) so I run the process manually:


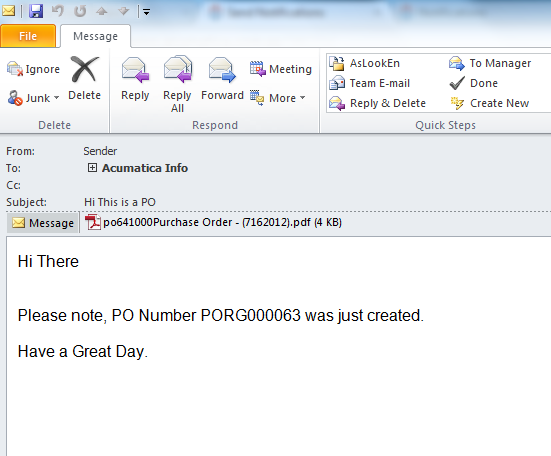
5. Enjoy reading e-mail

Have Fun,
Sergey.