Saturday, August 31, 2013

Snapshots. Easy Backup. Rapid Deployment.

Hi Everyone,

Time to discuss a nice option for cloud backup and rapid deployment. All of us dream about templates for implementation. It will make ERP closer to a box product. When you can buy software, apply a template, and that is it. One step towards it - Snapshots.

Think about snapshots like backups, that we can do for the whole system. And because our customizations and reports are stored in the database, we can include them into a snapshot as well.

For the template we have made few types of the snapshots to help partners implement the system quickly, by copying template installation to multiple clients. You can do your own!

Another important thing - snapshots can be saved as zip files, from the cloud server into your PC, like downloads. Alternatively they can be stored inside the database, as a blob files.

Lets create one.
Open System->Management->Companies. On the first tab you will see existing snapshots sitting in the database.


In order to create the snapshot - just press a button on top, Create Snapshot, a dialog will appear to give it a Name and choose the snapshot type.
Here we have to decide, we need it as a backup, with full data in it, or as a template for another customer site installation or like after we finished Proof of Concept stage, its good to copy to production all the setups and master files.

Take a note, transactions can be skipped!
Meaning no need to clean up the POC to turn it into production site !


Then there will be 2 options, Include Customizations and Prepare Data for Export.
Fist one is obvious, second one will make a zip file and store it inside the system. So you can download it later.

So here is the thing, you can just keep your snapshot within the database or you can download it and store on your PC/Store etc.

If zip file is ready to download, snapshot will show Prepared check box checked. Other wise you can still press button Prepare Snapshot.

Now if I click Export Snapshot, the file will be downloaded to my PC.
I can Upload file to the server by pressing Import Snapshot.

Then FINAL stage is restore the snapshot. You can do it by pressing Restore Snapshot button and it will place data from snapshot file into database tables.

Here is a small video related to snapshot creation, download, upload and restoration.


All the best,

Sergey.

Changing Login Picture.

Hi Guys,

Mike inspired me today with a good idea for a blog.
At the last day of summer, I would like to re-brand Acumatica Cloud ERP login picture.
From what it looks now:


You already know that with version 4.1 login frame auto refreshes every time.
We have pool of seven predefined pictures. They are kept here:


At present, the only option is to replace these images with what we want:


And here is the result:


The only problem is, every time we upgrade Acumatica, system will overwrite these pictures, so for the time being, have to copy them over from backup location. In the future we will make them stay.

All the best,

Sergey.

Wednesday, August 28, 2013

Linking Sales Order to Purchase. Stock Allocation.

Hi Everyone,

One of the questions from our partners was - why don't we have a topic at Acumatica University on how to tie Sales Order to Purchase Order, then break this link, then see the goods allocation in the inventory.

Basic business process behind is when we sell something we may wish to buy goods for this specific sales order. And then, at some point we may reconsider and dedicate goods for another Sales.

I am using Demo database to demonstrate it.

What I did first is switched off sub items, not to mess up the picture.
(Well, if you like to know how to switch off sub items on demo database, please let me know, it was done not from UI.)


Step One. Create an Item in Stock Items screen.

Nothing special. Using version 4.1


After Item created I made a receipt in Inventory for 1000 pieces.


Step Two. Make a Sales Order.

Here I used the above item indicating a line should be Ship Complete. Added some quantity and price. Take note of Mark for PO check box. Will use it in the next step.


Step Three. Link SO to Existing PO.

To achieve it, will mark check box Mark for PO. Then Press PO Link button.
We may already have a PO, so we can link to existing one.


We should select the line on that screen then Save to mark that existing PO to the SO.

Step Three A. Create PO for SO on the fly.

Alternatively we may wish to create new PO for that Sales Order. Let's go to Actions->Create a PO. Then screen below comes out. Here we need to indicate the Vendor and Location and then click Process to create a PO. Once created, SO will get link to that PO automatically.


Here is the SO. Take note of the link.


Step Four. Break the link. Allocate to Another PO.

Let say we have reconsidered and wanted to reallocate the sales order to another vendor PO.
This is achieved at the Sales order. Unchecked Mark for PO on the line, save. It will automatically remove PO link. Now lets link to another vendor PO. Check Mark for PO again. Save.
Then call PO Link button. Now we can choose another vendor and PO.


Step Five. Verify Figures.

We can use either Inventory Summary to see current inventory positions


Or Allocation Details


Step Six. Receive PO and see what Happened.

Here is the receipt


And Sales Order can be now shipped. I created shipper document then confirmed it. Standard process.

Question why do we swap POs for a single SO - could be if we want to manage sales better, let say we expect delivery of the same car parts faster from vendor A than vendor B, and have customer RIGHT IN FRONT waiting... We may wish to consider reallocation POs... ;)

All the Best,

Sergey.

Sunday, August 25, 2013

Translating Acumatica. Changing Field Labels. Regional Settings.

Hi Everyone,

A task to translate the user interface is quite common in Asia, with it's multiple business cultures and languages spoken.

It can easily be done via translation tool inside Acumatica Cloud ERP. No Customization is necessary.
We can use the same approach when just a slight amendment of field names or grid labels is needed.

So first what we have to do - is to define a language.

Open System->Management->System Locales. Add new system Locale, well it can be a brand new language or the same English language, may be different region, for which we like to change the terminology. In my example English Singapore was created.


Once I made it active, system will include additional language into a login screen.


Then we can change default Date / Time format etc., basically all Cultural changes that we have in our computer we can impose on Acumatica. So when people from country A use it the have say DAY-MONTH-YEAR format but at the same time, user in country B will have YEAR-MONTH-DAY for example.


Now it is time to do the Translation. Please navigate to System->Management->Translation Dictionaries and choose language that we want to modify.


System displays all the labels at the grid below. For each label it lists all the places where it was used , take a look at the lowest portion of the screen. What we can do with it is to try the filter to narrow the list down to only specific labels or use the quick search field and then enter target value, which is translated field into the right column of the grid.


So lets try to translate the field Batch Number that is used at the General Ledger Journal Transactions screen. I would like to change it to "Document Sequence".


Entered Batch Number into a search bar, then highlighted the row with the Batch Number label, then added value to Target to be Document Sequence. Then Saved.
Line disappears right after save. Its because we have not selected Show Localized check box on top.


In order for changes to get effective, we have to re-login to the system and choose different language on login page. Right after it, modification is in effect.


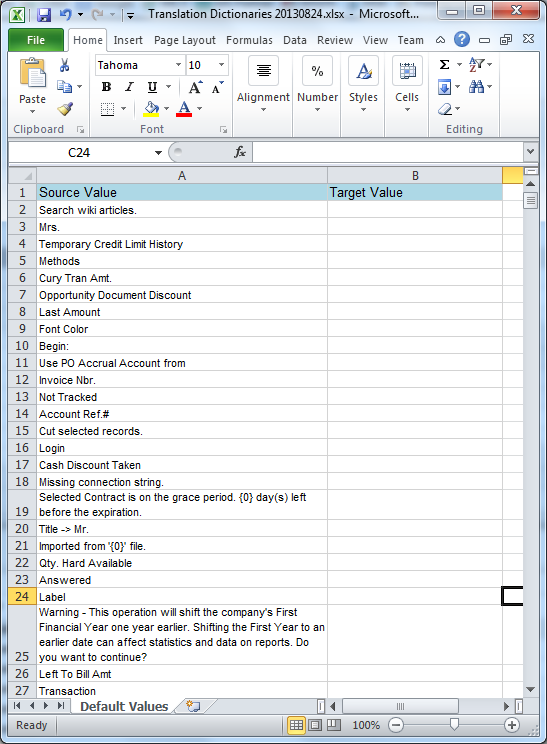
If needed to translate all labels in one shot, it is possible by exporting labels into Excel file, then using professional translator (or just Google :) ) to change the labels, then uploading file back to the system.
Lets export labels fist.


Then save file locally then translate all the content to say Chinese simplified.


And now, we are just uploading this file back to Acumatica.


Save it and we are done. Re-login.


All the best,

Sergey.

Wednesday, August 21, 2013

Application Pool Settings. Make Sure its 64 bit.

Hi Guys,

Just wanted to share application pool settings, that we should set in order to allocate memory better by WEB server.

Assuming we use 64 bit machine to host our IIS server, we may still choose 32 bit or 64 bit compatibility for Application Pool.

32 bit mode allows us to debug the process, therefore we could forget to switch it back to 64 bit mode after debug process it complete and we go for production.

How can we identify that Web Site is using 32 bit mode? Just look at the task manager:


As long as you see x32 at the end of the IIS Worker process name - it runs in 32 bit mode.

Form IIS you can find this option under Application Pool settings


What may happen on production environment when it runs on 32 bit mode, system may consume all memory, and due to 32 bit mode it will not be able to scale it above 2G/4G. And what will happen next:


In order to prevent it from happening, we should switch Application Pool BACK to 64 bit mode:


All the best,

Sergey.